1. What you need
Everything on this list is either already on your site or takes five minutes to get.
| WordPress | 6.6 or newer |
|---|---|
| PHP | 8.2 or newer |
| Image extension | GD or ImageMagick — used to resize photos and stamp the watermark |
| HTTPS | Required. The AI providers only accept secure requests, and the visitor session cookie is secure-only. |
| AI provider account | A fal.ai account and API key. You pay them directly. |
| Product photos | 2–5 clean photos per category. These are what the AI copies into the room. |
2. Install and activate
- In WordPress, go to Plugins → Add New → Upload Plugin.
- Choose the plugin
.zipfile, click Install Now, then Activate. - A new AI Remix menu appears in the dashboard sidebar. Open it — the first tab, Getting Started, repeats this checklist inside your own dashboard.
On activation the plugin creates its database tables, writes its default settings and makes a private folder for visitor photos. Nothing is visible to your visitors yet — the wizard only appears on the pages where you place the shortcode.
3. Connect your AI provider
Open AI Remix → Image Provider. This is the only required provider.
- Paste your fal.ai API key and click Test connection.
- Click Discover models and choose one from the list. The default is
fal-ai/flux-pro/kontext/multi, which is the model this plugin is built around. - Leave the request timeout at its default (90 seconds) unless your host is slow, then switch Enable on.
define('HRE_FAL_KEY', 'your-key'); to wp-config.php. The plugin prefers the constant when it is defined, and the field in the dashboard then just shows that a key is set.You can leave the provider switched off while you build your catalogue — visitors see your “temporarily unavailable” message instead of a broken button, and nothing can be billed.
4. Build your catalogue
The catalogue is what makes this your shop’s tool instead of a generic AI toy. It lives on AI Remix → Remix Photo and has three levels: category → styles → product images.
Create a category
Give it a name your customers would recognise (“Dining tables”, “Sofas”, “Rugs”) and a base prompt — the sentence the AI actually reads. Example:
a dining table set in a residential dining room, natural light, photorealistic interior photograph
Create one category per product family you sell.
Add product images
Click Add images, pick from the Media Library (you can select several at once). Each one becomes a card your visitor can choose. You can edit the alt text — that becomes the label under the card — reorder the cards, or remove one from the catalogue (the Media Library file stays untouched).
Add styles
A style is a name plus a prompt fragment that shapes the mood, for example warm evening light, cozy, wood tones, soft shadows. Visitors pick a style by clicking a button, so 3–5 styles per category works best — more starts to feel like a menu.
5. Put it on a page
Create a page — “See it in your room” is the usual name — and place the shortcode in it:
| Shortcode | What it shows | Options |
|---|---|---|
[hoelee_ai_photo_remix] | The four-step wizard: upload → product → style → generate | none |
[hoelee_ai_photo_remix_share](alias [hoelee_ai_photo_gallery]) | The public gallery of results your visitors chose to share | per_page (default 12), columns (default 4), target |
How to place it
- Block editorAdd a Shortcode block and paste it in.
- ElementorAdd the Shortcode widget (or an HTML widget) and paste it in.
- Theme templateUse
do_shortcode('[hoelee_ai_photo_remix]')in the template file. - Where to put itThe product page itself, or a dedicated page linked from your product pages and your menu.
6. What your customers see
A four-step wizard on one page. No account, no sign-up, nothing to install on their side — and most of them will do it on a phone.
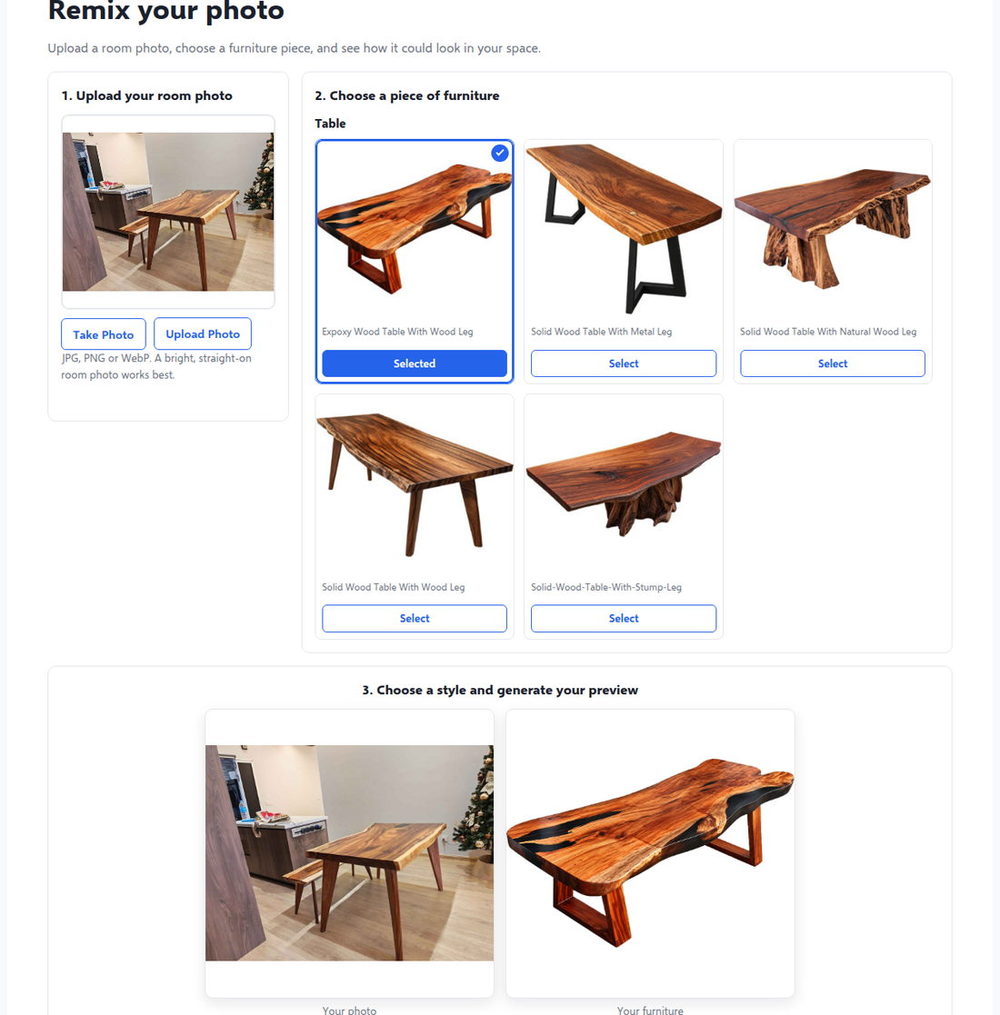
- Upload the room photo. File picker, drag-and-drop, or the phone camera. Size, type and pixel count are checked immediately, in plain language, before anything is uploaded.
- Choose a product. Your catalogue, filterable by category, one card selected at a time.
- Choose a style. One button per style in the chosen category.
- Details (only if you enable lead capture). Your form, plus the “share this result publicly” checkbox, and the single action button: Show me result.
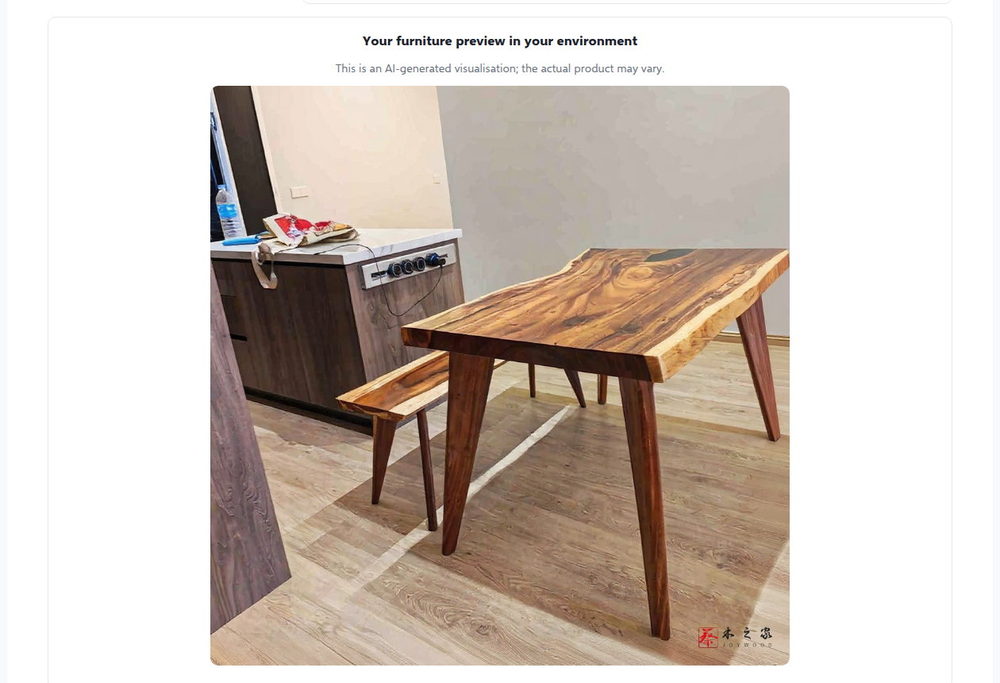
The render arrives in about 10–30 seconds, watermarked, with a download button (if you leave it on) and the share toggle. If a visitor closes the tab while it is working, the job still finishes on your server.
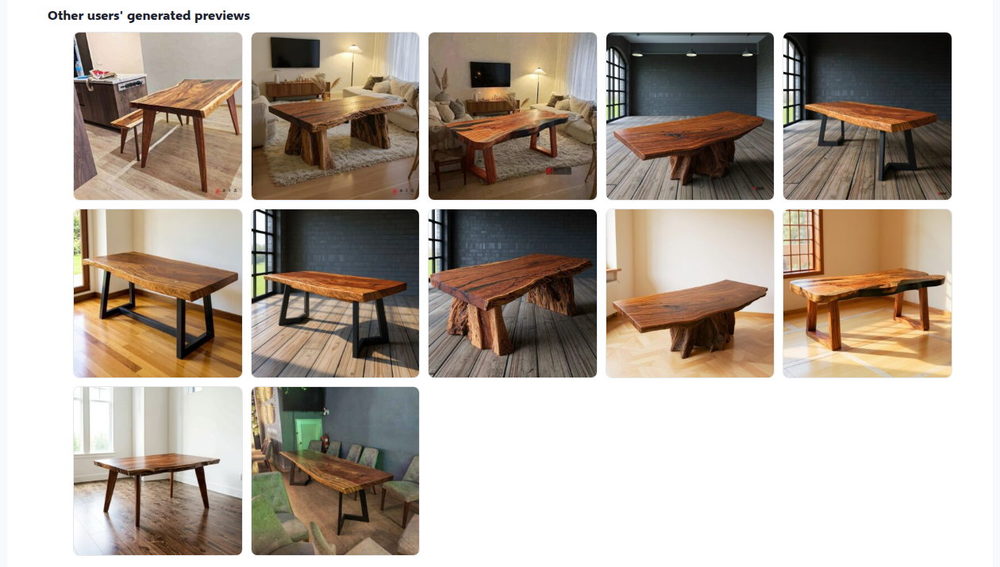
Results your visitors chose to share appear in the public gallery, which is a good place to send people who are still deciding.
7. Set these on day one
Two tabs matter before you go live: Security & Limits (protects your bill and your visitors’ privacy) and UI Setting (every word your visitors read).
| Setting | Default | Why it matters |
|---|---|---|
| Per-IP generations | 30 / 360 minutes | Stops one visitor or a script from looping |
| Monthly site-wide cap | 250 | The hard ceiling on your provider bill — warns at 80%, blocks at 100% |
| Concurrent jobs | 2 per visitor | Prevents a pile-up from one session |
| Upload burst | 20 / hour | Rate-limits the cheap half of the pipeline too |
| Retention | 7 days | Uploads, results, sessions and IP records are deleted after this |
| Watermark | On — site logo, bottom-right, 5%, 40% opacity | Your mark on every render; check it with Preview watermark |
| Share checkbox | On | Whether “share publicly” starts ticked for the visitor |
| Allow download | On | Whether visitors get a download button for their own result |
UI Setting holds every visitor-facing string, grouped by where it appears — headings, buttons, progress messages, the consent lines and the gallery labels. Leave a field empty to keep the shipped default; each field shows the default in its placeholder. Clear your page cache after editing, or the old wording keeps being served.
Lead capture is off by default. Switch it on and the wizard asks for the visitor’s details before generating — the moment of highest intent. The defaults are name, WhatsApp number, email, message and a consent checkbox, and every field is editable. Leads are stored in your database and, if you enable it, POSTed to a webhook (n8n, Make, Zapier, a CRM or a Google Sheet). A lead is saved even when the webhook is switched off.
X-Forwarded-For and list your proxy addresses under Trusted proxies — otherwise the per-IP limit counts everyone as one visitor.8. Getting better renders
- Ask for a bright, straight-on room photoDaylight, camera held level, the area where the product will go clearly visible. Extreme wide-angle shots and dark corners are the two things that spoil a render.
- Use a clean product photoWhole product in frame, plain background, even lighting. What you give it is what it copies.
- 3–5 styles, not 15Enough choice to feel tailored, few enough to decide quickly.
- Name categories the way customers talk“Dining tables” beats “Category 3”. The name is what they see; the base prompt is what the AI reads.
- Put the wizard where the decision happensOn the product page, or one click from it, and link it from your WhatsApp catalogue and quotations.
- Let the gallery work for youFinished rooms from real customers are the most persuasive thing on the page.
9. Troubleshooting
| Symptom | Most likely cause and fix |
|---|---|
| “Show me result” stays disabled | A required choice is missing — upload, product or style. Also check the chosen category still has images and styles. |
| Visitors see “temporarily unavailable” | The provider is switched off, or no key is set. Image Provider → enable, add the key, Test connection. |
| Generation fails or times out | Invalid key, wrong model, your host blocking outbound HTTPS, or a provider queue. Re-test, try another discovered model, raise the request timeout. The Usage tab shows the failed call. |
| Upload rejected — too large | Over the 15 MB raw ceiling or the 50 MP pixel ceiling. Ask for a smaller photo, or raise the ceilings. |
| Upload rejected — unsupported type | Only JPEG, PNG and WebP are accepted. |
| No watermark on the result | Watermarking is off, or the site logo was removed. Check the settings and hit Preview watermark. |
| “You have reached the limit” | The per-IP rolling limit (30 / 360 minutes) was hit. Raise it for launch, or wait out the window. |
| “Monthly limit reached” | The site-wide cap was reached. Raise it, or wait for the month to roll over. |
| Leads stay “failed” | Wrong webhook URL, a non-2xx reply, or outbound HTTP blocked. Use Send test webhook, then Resend. |
| The lead form never appears | Lead capture is off, or every field is optional — at least one field must be required. |
| Front end still shows old wording | Page cache. Purge the cache for that page. |
| Generation is slower than 30 seconds | Provider queue at peak times. The “still working” notice covers it and the job finishes server-side. |
Where to look first: Usage Statistic (did the call happen?), then Generated Photos (did an image come back?), then your fal.ai dashboard (was it billed?).
10. Help and support
Every licence includes a year of email support. When you write, include your WordPress version, PHP version, the plugin version, the model you are using and the exact text your visitor saw — that usually answers the question in one round.
- Email[email protected]
- WhatsApp+60 16-821 2007
- The plugin itselfThe Getting Started tab inside your dashboard repeats the setup checklist and the shortcodes.
- PrivacyUploads are stripped of EXIF data, originals are deleted after processing, and nothing is sent to us — see the privacy policy.
AI Remix Photo v0.0.27 · WordPress 6.6+ · PHP 8.2+ · a plugin by Chai Joy Wood (Joywood 木之家), Taiping, Perak, Malaysia.